As you stand in the frozen wilderness, gazing up at the night sky, the Northern Lights begin to unfurl their ethereal display. But what you often see in photos – vibrant, neon hues dancing across the horizon – is only half the story. In reality, the diffuse glow of the Northern Lights is a far more subtle, yet mesmerizing spectacle. You might be surprised by the soft, whispery quality of the light, or the way it seems to pulse with an otherworldly energy. But what’s the difference between this real-life experience and the photographs that have captivated your imagination? And how can you capture this elusive beauty through the lens of your camera?
Key Takeaways:
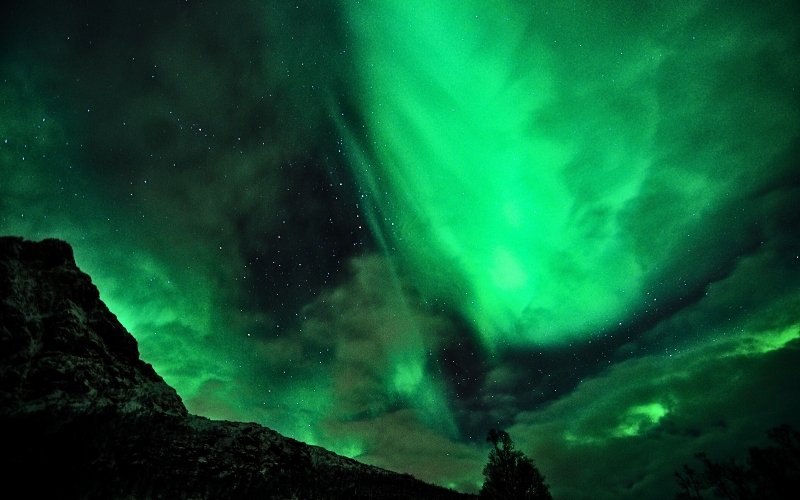
- Diffuse Glow in Reality: The Northern Lights’ diffuse glow appears as a soft, ethereal mist that fills the sky, unlike the vibrant, sharp curtains of light often depicted in photos. In person, the diffuse glow can be mesmerizing, with an otherworldly quality that’s difficult to capture on camera.
- Difference between Reality and Photos: Photos often exaggerate the vibrancy and definition of the Northern Lights, making them appear more intense and structured than they do in reality. This is because cameras can capture a wider range of colors and light levels than the human eye, creating an enhanced visual effect.
- Camera Settings and Beyond: To capture the Northern Lights’ diffuse glow, use a camera with manual settings, a wide-angle lens, and a low ISO (100-400). However, it’s not just about the camera settings – being patient, flexible, and prepared to adapt to changing light conditions is crucial. Additionally, the Northern Lights can take on various shapes beyond the diffuse glow, including coronal, arc, and pillar forms, each offering a unique visual experience.
The Unrealized Expectations
To venture out into the Arctic wilderness, braving the freezing temperatures and darkness, only to be met with an underwhelming display of the Northern Lights, is a disappointment many have experienced.
The Misleading Photos
The vibrant, swirling curtains of green and purple that dance across the night sky in photographs have set the bar high for your expectations. These images, often captured with the aid of tripods, long exposures, and careful editing, create an unrealistic representation of the phenomenon.
The Reality Check
Reality hits when you’re standing in the middle of nowhere, gazing up at a sky that’s more of a soft, milky glow than a dazzling display of colorful lights.
It’s necessary to understand that the diffuse glow of the Northern Lights is often much fainter than what you’ve seen in photos. The colors may be more muted, and the movement less dramatic. This doesn’t mean the experience is any less breathtaking, but it’s crucial to temper your expectations to avoid disappointment. On the other hand, the diffuse glow can be surprisingly immersive, enveloping you in an ethereal ambiance that’s difficult to capture on camera.
The Elusive Diffuse Glow
Some people might think that witnessing the Northern Lights is a guarantee of seeing the diffuse glow, but it’s not always the case. The diffuse glow is a subtle and fleeting phenomenon that requires specific conditions to appear.
What It Really Looks Like
The diffuse glow appears as a soft, hazy, and uniform illumination of the sky, often without any discernible structure or patterns. It’s as if the entire sky has been painted with a gentle, ethereal brush.
The Ethereal Experience
An unforgettable encounter with the Northern Lights awaits you when you witness the diffuse glow in person. It’s an otherworldly experience that will leave you awestruck and wondering.
Ethereal is the only word that comes close to describing the sensation of being surrounded by the diffuse glow. You’ll feel as though you’re floating in a celestial sea, with the lights dancing around you like gentle waves.
Capturing the Essence
Experience the thrill of capturing the diffuse glow on camera, but be prepared for a challenge. With the right settings, such as a wide-angle lens, low ISO, and long exposure, you might just freeze the magic in time.
This is where patience and practice come into play. Experiment with different camera settings, and don’t be discouraged if you don’t get it right immediately. Keep in mind, the diffuse glow is elusive, but with persistence, you might just capture its essence.
Camera Settings for the Win
Unlike the vibrant, neon-lit displays often seen in photographs, the Northern Lights’ diffuse glow can be a bit more challenging to capture on camera. But fear not, dear reader! With the right camera settings, you can immortalize this breathtaking phenomenon and relive the magic whenever you want.
Exposure and ISO
The key to capturing the Northern Lights’ diffuse glow lies in finding the perfect balance between exposure and ISO. Aim for an exposure time of around 10-20 seconds, and set your ISO to 1600-3200. This will help you freeze the movement of the lights while keeping the noise to a minimum.
Shutter Speed and Aperture
To capture the soft, ethereal quality of the diffuse glow, you’ll want to experiment with slower shutter speeds and wider apertures. Try setting your shutter speed to around 10-15 seconds, and your aperture to f/2.8 or wider.
Another important consideration is the type of camera you’re using. If you have a camera with manual focus, make sure to set it to infinity to ensure that the lights are sharp and clear. Additionally, consider using a remote shutter release or the camera’s self-timer to minimize camera shake and ensure a steady shot.
Tips for Capturing the Diffuse Glow
Exposure is key when it comes to capturing the Northern Lights’ diffuse glow. Here are some tips to keep in mind:
- Use a tripod to stabilize your camera and prevent camera shake.
- Shoot in RAW to capture more image data and give yourself more flexibility during post-processing.
- Avoid overexposure, as this can result in lost details and an unnatural look.
The key to capturing the Northern Lights’ diffuse glow is to be patient and flexible. Be prepared to experiment with different camera settings and techniques until you find what works best for you.
Camera settings aside, it’s also important to remember that the Northern Lights are a natural phenomenon, and their behavior can be unpredictable. Be prepared to adapt to changing conditions, and don’t get discouraged if your shots don’t turn out as expected. With practice and patience, you’ll be capturing stunning images of the Northern Lights’ diffuse glow in no time!
Beyond the Diffuse Glow
Despite the mesmerizing beauty of the diffuse glow, there’s more to the Northern Lights than just a soft, ethereal haze. In reality, the aurora borealis can take on a multitude of forms, each one more breathtaking than the last.
The Many Faces of the Northern Lights
The Northern Lights are notorious for their unpredictability, and their shape-shifting abilities are a big part of their allure. You might be lucky enough to witness a display that’s more like a dramatic dance, with tendrils of light swirling and twirling across the sky.
Pillars, Curtains, and Coronal Displays
Curtains of light that seem to ripple and undulate, like a cosmic fabric, are a common sight during intense auroral activity. These formations can be so vivid that you’ll feel like you’re standing right in the midst of an intergalactic spectacle.
Northern Lights enthusiasts often speak of pillars, which are tall, narrow columns of light that rise from the horizon like shimmering sentinels. And then there are coronal displays, where the lights form a crown-like shape around the pole, as if the aurora is paying homage to the celestial throne.
The Rare and Elusive Forms
An unusual sighting of the Northern Lights might reward you with a glimpse of proton arcs, which appear as bright, narrow streaks that cut across the sky like celestial swords. Or, if you’re extremely lucky, you might catch a glimpse of STEVE, a recently discovered phenomenon that manifests as a purple ribbon of light.
With a bit of luck and some careful planning, you might just find yourself in the presence of these elusive forms, and the experience will be seared into your memory forever. So, don’t settle for just a diffuse glow – venture beyond, and discover the full, dazzling range of the Northern Lights.
The Science Behind the Spectacle
All the magic of the Northern Lights begins with the science behind this natural phenomenon. To truly appreciate the diffuse glow, you need to understand what’s happening above and around you.
Solar Winds and Magnetic Fields
Solar flares and coronal mass ejections from the sun release a torrent of charged particles, known as solar winds, into space. These winds interact with the Earth’s magnetic field, causing the particles to be drawn towards the poles. This collision of particles and magnetic fields is what sets the stage for the spectacular display of the Northern Lights.
The Auroral Oval and Its Secrets
An invisible ring of light, the auroral oval, encircles the polar regions, marking the area where the solar winds collide with the Earth’s magnetic field. This oval is where the magic happens, and you’re lucky to be witnessing it.
Winds in the Earth’s atmosphere play a crucial role in shaping the auroral oval. The rotation of the Earth and the movement of the atmosphere create a complex dance of air and particles, resulting in the dynamic displays of the Northern Lights. You’re not just seeing a static image; you’re witnessing a dynamic, ever-changing process.
The Colors of the Northern Lights
Science tells us that the colors of the Northern Lights are a result of the energy released when particles collide with the Earth’s atmosphere. Green is the most common color, produced by collisions at altitudes of around 100-200 km. Red is a sign of high-altitude collisions, while blue and violet indicate lower-altitude interactions.
Magnetic fields and atmospheric conditions can alter the colors you see, making each display unique. You might be treated to a rare display of crimson or purple, depending on the strength of the solar winds and the density of the atmosphere. The colors are a reminder that the Northern Lights are a complex, dynamic phenomenon, and you’re privileged to be witnessing it firsthand.
Chasing the Northern Lights
Keep in mind that witnessing the Northern Lights is a thrilling adventure that requires dedication, flexibility, and a bit of luck. As you begin on this journey, you’ll soon realize that the experience goes beyond the mesmerizing visuals – it’s about immersing yourself in the Arctic environment and embracing the unpredictability of nature.
Best Locations for Viewing
Optimal locations for viewing the Northern Lights typically lie near the Arctic Circle, where the nights are darkest and the auroral activity is most intense. Tromsø in Norway, Lapland in Finland, and Yellowknife in Canada are some of the top destinations for Northern Lights sightings.
Timing and Weather Conditions
Timing is everything when it comes to chasing the Northern Lights. Peak Aurora season typically occurs between September and April, when the nights are dark enough to allow for optimal viewing. However, clear skies and high solar activity are also crucial factors in increasing your chances of witnessing this phenomenon.
The timing of your trip is critical, as the Northern Lights are most active around the equinoxes in March and September. Additionally, solar flares and coronal mass ejections can trigger intense auroral activity, making these periods ideal for viewing. Be prepared to stay up late, as the best viewing times often occur between midnight and 3 am.
Preparation and Patience
An imperative aspect of chasing the Northern Lights is being prepared for the unexpected. Dress warmly, as you’ll likely be spending extended periods outdoors in freezing temperatures. Bring hot beverages and snacks to keep you energized throughout the night.
Lights, camera, action! While capturing the Northern Lights on camera can be a challenge, a tripod, a wide-angle lens, and a camera with manual settings can help you achieve stunning results. Don’t forget to set your camera to a low ISO and a slow shutter speed to capture the diffuse glow. As you wait for the Northern Lights to appear, take in the tranquility of the Arctic landscape and enjoy the experience – it’s just as much about the journey as it is about the destination.
Northern Lights Online Tools: Chasing Aurora Like a Pro
The most useful Northern Lights online tools for a successful Aurora hunt. Are you about to hunt the Northern Lights on your own? Then you will find these resources helpful. If you are trying to see Aurora for the first time we recommend signing up for the Northern Lights Online Course where is explained step-by-step all you need to know to see the Northern Lights in an easy way.
-
Northern Lights essential online tools designed for beginners to help you see Aurora like the handy Aurora Mobile App and Northern Lights Online Course will help you to understand how Aurora works and to monitor real-time activity.
-
The Northern Lights Forecast and Kp index for 3 days and long-term Aurora forecast for up to 27 days ahead can be found here: Geophysical Institute Forecast, NOAA Aurora Forecast, Spaceweatherlive Forecast or in the Northern Lights App.
-
Find the best Aurora spots with the light pollution map and cloud cover prediction.
-
Northern Lights activity in real-time: Real-time Aurora activity (worldwide magnetometers), Solar Wind activity, Sun’s activity, Aurora live Boreal webcams list or Aurora App.
-
Additional resources to know when it will be dark enough Darkness graph & Map and how much the moon will illuminate the sky Moon Phase + Moonrise & Moonset.
-
If you decide to go with professional Aurora hunters here you can find the top-rated Aurora Tours.
- Guides on how to hunt Aurora: Northern Lights Alaska, Northern Lights Canada, Iceland Northern Lights, Norway Northern Lights, Northern Lights Sweden, Finland Northern Lights, Northern Lights Scotland
To wrap up
With these considerations, you’re now better equipped to distinguish between the curated perfection of Northern Lights photography and the ethereal experience of witnessing them firsthand. The diffuse glow, often lost in translation on camera, is a mesmerizing aspect of this natural phenomenon. While your camera may struggle to capture its soft, eerie beauty, your own eyes will drink in the spectacle. So, when you finally find yourself under the aurora’s spell, remember to put down your camera and simply bask in the otherworldly ambiance – it’s an experience that will stay with you long after the shutter clicks.
FAQ
Q: How does the diffuse glow of the Northern Lights look like in reality?
A: The diffuse glow of the Northern Lights, also known as the aurora borealis, appears as a soft, ethereal illumination in the night sky. Unlike the vibrant, swirling patterns often captured in photographs, the diffuse glow is a more subtle and gentle display of light. It can be described as a faint, misty veil that hangs in the air, casting an otherworldly ambiance over the landscape. In person, the diffuse glow can be mesmerizing, with its gentle undulations and soft color palette creating a sense of wonder and awe.
Q: What’s the difference between seeing the diffuse Northern Lights in reality and in photos?
A: While photographs can capture the vibrant colors and dynamic patterns of the Northern Lights, they often fail to convey the subtlety and nuance of the diffuse glow. In reality, the diffuse glow is a more muted and soft display of light, whereas photographs can make it appear more vibrant and intense. Additionally, cameras can pick up on details that may not be visible to the naked eye, such as the intricate patterns and colors of the aurora. In person, the experience of witnessing the Northern Lights is often more about the atmosphere and ambiance they create, rather than the specific details of the display.
Q: What are the best camera settings to capture the Northern Lights’ diffuse glow?
A: To capture the Northern Lights’ diffuse glow, it’s necessary to use a camera with manual settings. A good starting point is to set your camera to a low ISO (around 400-800), a wide aperture (around f/2.8), and a slow shutter speed (around 10-20 seconds). This will allow you to capture the soft, gentle light of the diffuse glow. You may also want to experiment with longer exposures to capture the movement and flow of the aurora. Additionally, consider using a tripod to stabilize your camera and reduce camera shake. Finally, be prepared to adjust your settings based on the intensity and movement of the aurora, as it can change rapidly.